Timestamp 14.8 Million Years BCE: The Exact Moment the Terrain Fractured
Pay attention.
Position yourself in central Bavaria, boots planted firmly, completely unaware of the 25-kilometer geological fracture directly beneath you.
You dropped into this sector to pull and classify hyper-velocity impactites, yet progress remains stalled.
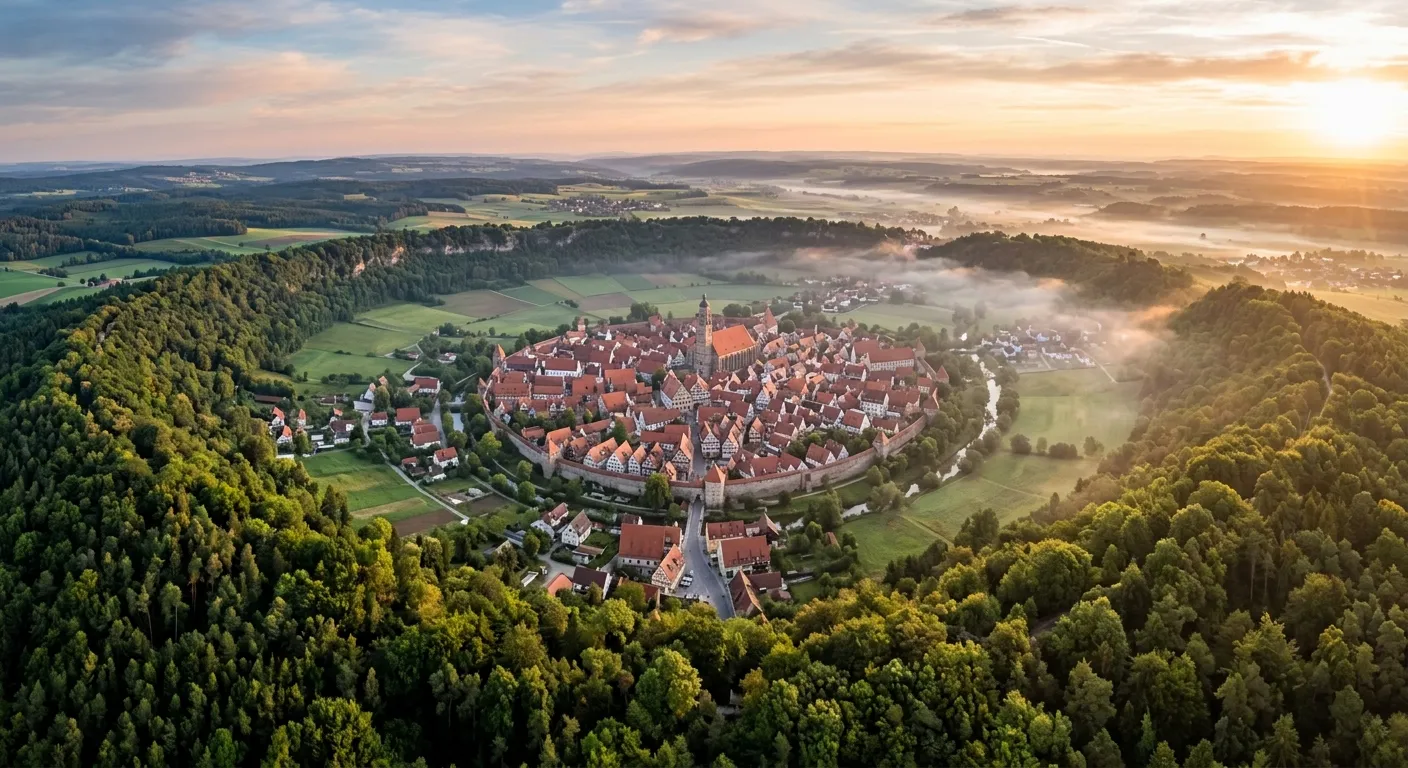
The reason? This entire medieval township was literally built in an impact crater.
The massive topographical basin is notoriously hard to see from ground level, causing you to wander aimlessly across a flat plain while 72,000 tons of micro-diamonds remain hidden inside the local architecture.
As your field instructor, I will completely overhaul your approach to surveying, extracting, and processing impact geology.
Forget the standard history lectures regarding the Nördlinger Ries; your objective today is executing a flawless, precision geological extraction.
Here is your operational diagnostic breakdown. If crater mapping or ejecta identification remains unsuccessful, you are likely failing across one of three specific vectors:
1. Topographical Blindness:
You rely heavily on localized, line-of-sight observation instead of scanning macro-elevation gradients.
2. Stratigraphic Confusion:
You fail to separate the silica-heavy surface ejecta from the carbonate-dense basement fallback.
3. Visual Miscalibration:
You anticipate standard terrestrial igneous structures, leaving you entirely unprepared for materials so visually alien they have been multiple times mistaken for subnautica concept art by amateur field technicians.
Grab your gear and let us correct these operational failures.
⚙️ Core Prerequisites & Alternative Loadouts (Tools Required)
Before stepping off the asphalt and into the field, verify your hardware. Never deploy into the Nordlinger Ries sector without calibrating your equipment. Ensure you have the exact tools required for this extraction.
Primary Field Loadout:
- Estwing Rock Hammer (22 oz): Utilize this for precision fracturing of the breccia matrix.
- 10x and 20x Jeweler’s Loupe: Mandatory optics for isolating the 0.2mm micro-diamonds embedded within the host rock.
- 10% Hydrochloric Acid (HCl) Dropper: Critical chemical agent for rapid carbonate dissolution testing on site.
- NRM2500 (Near-Range Mapping) Topo-Dataset: Ensure this is pre-loaded onto your GPS device for micro-elevation tracking along the crater rim.
- NRIM (Non-Reactive Impactite Matrix) Calibration Chart: Deploy this reference to visually segregate terrestrial volcanics from hyper-velocity impactites.
Low-Cost Alternative Options:
- Alternative 1 (Topography): If the operational budget restricts LiDAR drones or NRM2500 software, abandon the digital tech and leverage the medieval infrastructure. The entire crater basin and its 100-meter forested rim can be perfectly seen from the Daniel church tower. Hand over a few euros, climb the stairs, and secure a flawless 360-degree macro-view of the impact ring.
- Alternative 2 (Chemical Testing): If transport regulations prevent sourcing field-grade HCl, utilize the natural weathering environment. Across vast geologic timelines, carbonates dissolve easily in water. Scan for natural weathering patterns on exposed bedrock; if the stone appears deeply pitted and vertically washed by rainfall, you are examining the carbonate basement, not the silica ejecta.
🛠️ Operational Protocol: Step-by-Step Impactite Extraction
This phase forms the backbone of your deployment. We will isolate the two primary materials generated by this 70,000 km/h kinetic collision. Observe closely, because the ejecta and the fallback are wildly different in appearance.
Step 1: Calibrate Macro-Vision and Locate the Suevite Matrix
Extraction remains impossible without visual confirmation. Your initial physical action requires bypassing the ground-level optical illusion to locate the suevite—the impact-melt breccia.
- Secure your equipment packs and ascend the Daniel church tower located in the town center.
- Direct your line of sight outward toward the tree line. Scan for a subtle, continuous ridge encircling the municipality. That marks your 25km boundary.
- Climb down and walk directly up to the unplastered walls of the town's medieval fortifications. Historical builders mined the crater floor to construct these barriers.
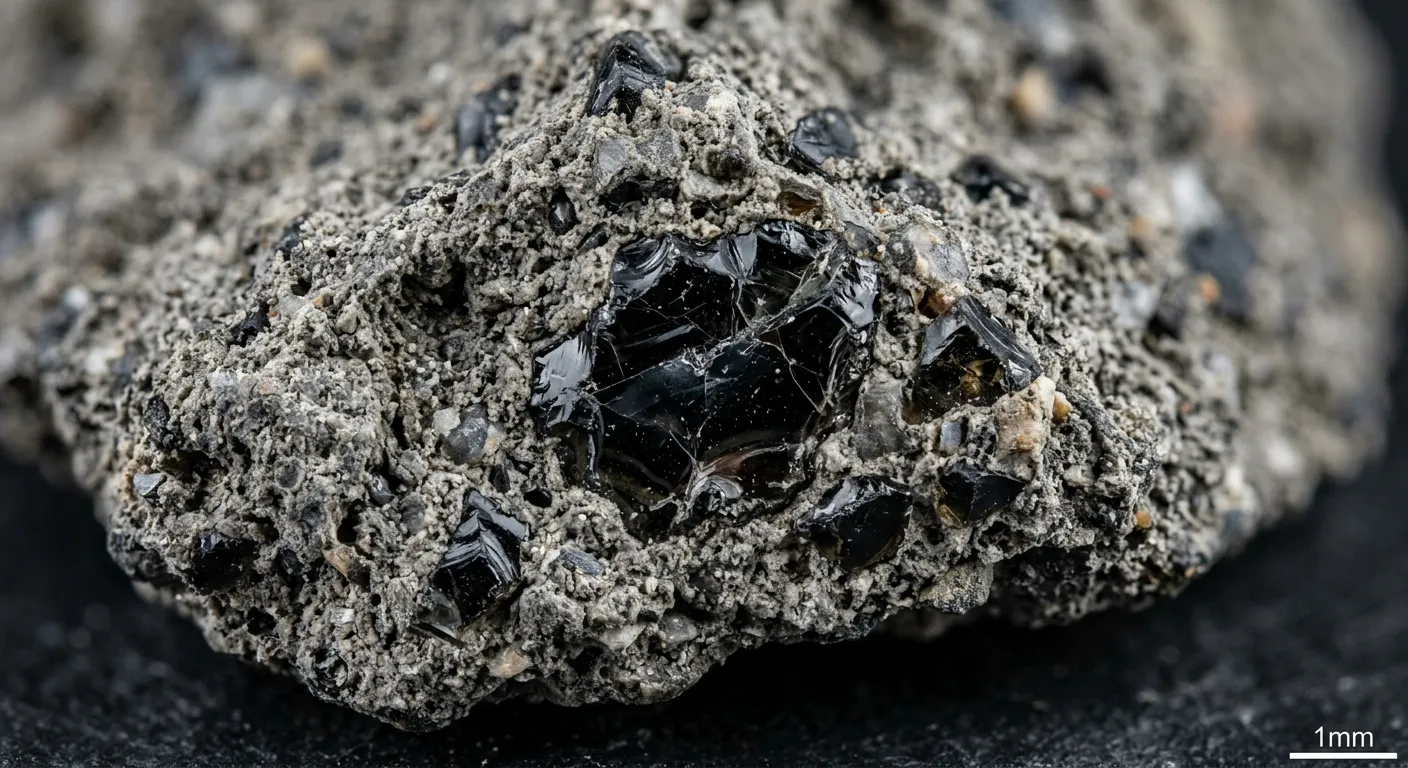
- Examine the gray, highly porous stones closely. This material is the suevite.
Step 2: Execute the Micro-Diamond Optical Sweep
Positioned directly in front of a raw suevite deposit, you will now hunt the kinetic payload: micro-diamonds.
- Grip a freshly fractured segment of suevite. Ignore heavily weathered exterior faces to maintain efficiency.
- Turn your back toward the sun to eliminate glare, and hold your 20x loupe precisely one inch from your dominant eye.
- Move the suevite rock slowly into the optical focal plane.
- Sweep the exact boundaries where the dark glass inclusions intersect the gray matrix. Search for microscopic, sub-millimeter hexagonal light reflections.
Step 3: Track and Extract the Distal Ejecta (Moldavite)
Shift your targeting parameters now. We are evacuating the Noerdlinger Ries sector entirely. The reason? The silica-rich topsoil was flash-melted by the impact and violently hurled hundreds of kilometers eastward.
- Transport your extraction unit to the fluvial gravel pits located in the Czech Republic (Bohemia/Moravia regions).
- Lock onto the sedimentary layers positioned roughly 15 meters beneath the modern topsoil.
- Sift aggressively through the sandy gravel. Hunt for translucent, forest-green glass exhibiting deeply grooved, aerodynamic surface textures.

🛑 Critical Failures to Avoid
Industry practitioners frequently observe junior geologists compromising their field deployments by repeating identical amateur errors. Lock these parameters into your operational memory to avoid catastrophic field failures:
1. Striking Medieval Masonry with a Geology Hammer
- The Mistake: Yielding to excitement over the 72,000 tons of diamonds and swinging a hammer at the town hall or church walls to secure a sample.
- The Consequence: Field reports indicate this action routinely results in immediate police interception, heavy financial penalties, and permanent site expulsion due to historical heritage vandalism.
- The Fix: Keep the hammer firmly holstered while inside municipal limits. To fracture raw rocks, drive 10 minutes outside the urban zone to the Aumühle quarry.
2. Searching for Moldavite in the Crater Basin
- The Mistake: Burning daylight digging through local Bavarian soil while expecting to uncover green moldavite glass.
- The Consequence: Complete operational failure. This guarantees a total waste of deployment time.
- The Fix: Comprehend the physical mechanics. The green glass ejected at escape velocities. Standing inside the crater means you occupy the fallback zone (suevite). Locating the glass requires driving east into the Czech Republic.
3. Misinterpreting Weathered Limestone as Impact Melt
- The Mistake: Isolating a fragment of local Jura limestone heavily pitted by water erosion and officially logging it as an aerodynamic impactite.
- The Consequence: Corrupted field datasets and severe professional embarrassment during senior tech reviews.
- The Fix: Execute the acid test without exception. Drop HCl onto the specimen. A violent reaction confirms it is merely water-dissolved carbonate. True silica glass (moldavite) remains completely non-reactive to field-grade hydrochloric acid.
🧠 Advanced Technical FAQ
Q1: Why does the NRM2500 topographic data show the crater rim as asymmetrical?
Instructor Output: The impactor bypassed a vertical trajectory, entering at an oblique angle (approximately 30 to 50 degrees) from the west-southwest. The resulting kinetic energy transfer obliterated the eastern rim with extreme prejudice, explaining why the moldavite strewnfield distributes into a highly distinct "V" shape pointing toward Bohemia.
Q2: I am utilizing the NRIM protocol, but the suevite matrix is crumbling in my hands. Is this normal?
Instructor Output: Affirmative. Unlike highly dense igneous basalt, suevite functions as a breccia—a chaotic amalgamation of shattered rock fragments fused by impact ash. In zones subjected to heavy groundwater exposure, the matrix degrades rapidly. Dig aggressively past the outer weathering rind to secure competent, solid rock suitable for thin-section analysis.
Q3: Can I extract the micro-diamonds by dissolving the suevite in acid?
Instructor Output: Mechanically possible, but strictly prohibited with standard field kits. The host rock contains silicates requiring Hydrofluoric Acid (HF) for dissolution. Industry safety protocols universally classify HF as an extreme operational hazard requiring highly specialized handling. Restrict chemical extraction entirely to heavily ventilated, industrial laboratory environments. Maintain strict adherence to optical identification while deployed in the field.
Q4: How do I definitively tell the difference between a highly shocked quartz grain and standard quartz under a microscope?
Instructor Output: Scan the specimen for Planar Deformation Features (PDFs). Standard quartz exhibits random or zero cleavage. Shocked quartz displays microscopic, perfectly parallel, tightly spaced lines intersecting at highly specific crystallographic angles. A standard 20x loupe lacks the optical power for this; deploy a polarized light microscope and a properly prepared thin section to verify.
Q5: Why are the surface soils here described as silica-rich while the basement is carbonate-rich?
Instructor Output: This relates to baseline geologic timelines and hydrology. Over millions of years preceding the impact event, surface carbonates dissolved in rainwater and leached downward into the substrate. This mechanical process left a highly concentrated layer of silica (sand/clay) at the upper boundary. Upon asteroid contact, the kinetic force skimmed this upper silica layer, melted it, and launched it across the European continent, leaving the deeper, denser carbonate basement to absorb the primary shockwave.